Jupyter Notebook
Jupyter Notebook (formerly IPython Notebooks) is a web-based interactive computational environment for creating notebook documents.
Run Jupyter Notebook on Vega
To run and use Jupyter Notebook on Vega please follow the instruction below:
-
Login to Vega gpulogin node
-
Book a compute node on Vega login node
salloc -n 1 --gres=gpu:1 --mem=40G --partition=gpu -t 4:00:00
The output of this command will show which gpu node is assigned. In this case allocated node is gn03.
[user@vglogin0005 ~]$ salloc -n 1 --gres=gpu:1 --mem=40G --partition=gpu -t 4:00:00
salloc: Pending job allocation 24529170
salloc: job 24529170 queued and waiting for resources
salloc: job 24529170 has been allocated resources
salloc: Granted job allocation 24529170
salloc: Waiting for resource configuration
salloc: Nodes gn03 are ready for job
bash-4.4$
- Login into the compute node from the login node
ssh gnXX
replace gnXX with the name of the compute node that was allocated to your job.
bash-4.4$ ssh gn03
The output below shows conection to gnXX (gn03).
The authenticity of host 'gn03 (<no hostip for proxy command>)' can't be established.
ECDSA key fingerprint is SHA256:Tso0v66J1JxJ/sgsbP8zAyVWhbfO9BzFsapna1tHFrc.
Are you sure you want to continue connecting (yes/no/[fingerprint])? yes
Warning: Permanently added 'gn03' (ECDSA) to the list of known hosts.
[user@gn03 ~]$
- Load modules
module load Anaconda3
- Run Jupyter lab
jupyter-notebook --port=7000 --ip=gn03 --no-browser
You should get token, like is shown below:
http://127.0.0.1:7000/?token=d741b8da1ce193bbc88aa719b80fe0527750d2bec9ac365e
This token is need to login in on Jupyter Notebook via local browser.
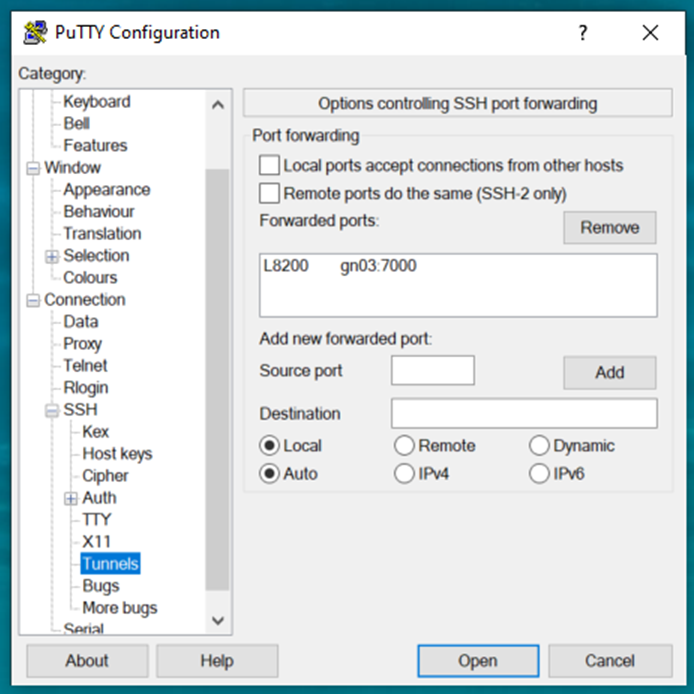
- Open a new tab terminal and tunnel to the node
For Windows users using puTTy:
Add Source Port: 8200
Add Destination: gn03:7000
For Linux and MAC users, use following command:
ssh -N -f -L 8200:gnXX:7000 <you-username>@vglogin0005.vega.izum.si
- Open your browser and enter the address
http://localhost:8200/?token=<your-token>
Additional information on link.